WinSCP Review
WinSCP is one of the popular free FTP client software program for Windows users. It is an open source application, so you can download and use it for free of charge. It is a good and free solution for the secure file transferring between a local and a remote computer. WinSCP also provides you SFTP client functionality. There is no limit on the size of the file transferred. However, there are restrictions placed by protocols used. SCP protocol does not support files over 4 GiB (32-bit boundary), while SFTP and FTP support them.
The program runs on any system running Win32 system including Windows 95 / 98 / 2000 / XP / Vista and Windows 7. WinSCP is also available as a plug-in to two file managers, FAR and Altap Salamander.
WinSCP Highlight Features
- Support for SFTP and SCP protocols over SSH-1 and SSH-2 and plain old FTP protocol.
- Batch file scripting and command-line interface.
- Directory synchronization in several semi or fully automatic ways.
- Integrated text editor.
- Support for SSH password, keyboard-interactive, public key and Kerberos (GSS) authentication.
- Integrates with Pageant (PuTTY authentication agent) for full support of public key authentication with SSH.
- Simple and easy to use interface.
- Translated into multiple languages including English, French, German, Spanish and more.
WINSCP 用法详解
WinSCP (Windows Secure Copy) is an open source SecureFTP client for Windows. It allows secure file transfers between the client's local computer and the remote server. In order to establish a secure connection through WinSCP the SSH support should be enabled. Otherwise, the WinSCP software can be used as a regular FTP client.
The WinSCP software uses cryptographical methods, integrated in SSH to protect your login details and private information. It prevents different types of attacks like password sniffing and malicious monitoring of the sessions between your local computer and the remote server.
The software can be downloaded from the following URL.
It requires Windows OS. The installation of WinSCP is quite simple. Basically you need to click on the Next button several times leaving the default options.
In order to customize it to your likings you can choose between the Norton-Commander interface and the Windows Explorer-like interface.

The main difference is that the first interface provides 2 panels (one with the local computer directory structure and the other with the remote) while the second shows only the remote. If you are used to work with applications like Norton Commander, Total Commander or Midnight Commander, pick the first option. If you prefer Windows Explored, go with the second.
The interfaces settings can be changed after the end of the installation too.
Once you are ready with the installation, you can establish a secure connection from your local computer to the remote server.
If you are a SiteGround client and you have enabled the SSH feature for your account, you can follow the steps listed below. Otherwise, please contact your hosting provider and check whether they provide SSH access.
Open the WinSCP client.
Navigate to the Session section.
Enter the Host name, the Port number (if you are a SiteGround client check the following article for the port and the private key setup details), the User Name and the Password (if you are a SiteGround client, leave this field blank, since we provide a very secure SSH solution through public and private encrypted keys). Pick the preferred protocol. The possible choices are: SFTP (Secure FTP), SCP (Secure Copy) and FTP.

During the establishment of the connection you will be prompted for the pass phrase, which is entered during the ssh keys pair generation.
Once the session is opened, you can perform all the standard FTP actions. The difference is that the connection is secured.

You can keep your connection details by storing them in the Stored Sessions subsection.

You can save your current session details, add a new session, edit, rename and delete an existing one. You can create a new folder for a chosen session, set it as the default one and create a desktop shortcut by using the Shell icon option. The Tools menu allows you to import a session from the Putty SSH client, to clean the data stored by the application on your local computer and to check for updates.
In the Environment section you can modify the server environment setup and adjust the timestamp.

The Directory subsection allows to set the default remote and local directories.

In the SSH section you can pick the preferred SSH protocol version and adjust the encryption cypher selection policy.

In the Preferences section you can switch between the Norton Commander and the Explorer-like interfaces.

The Explorer-like interface is more popular among the Windows users. In order to transfer files you can directly drag and drop them.

Additionally, you can alter other preferences like confirmation prompts, notifications, preferred editors for the files modifications, allowed transfer actions and many more.

Using the SiteGround SSH Hosting and the WinSCP software you will benefit from the highest standards in the secure file transfers.
In order to list all files and directories using an SSH client, you would need to execute the appropriate command. The command name, in this case, is ls and it accepts various parameters.
When using the command alone (without arguments):
ls
the output will be all visible files and folders without additional formatting or information.
In order to view more information about the files (such as their permissions, ownership, last modified date, etc) and at the same time to list the files and directories, you would need to supply additional arguments to the command. The most common arguments are as follows:
ls –a
(Short from –all) Lists all files and folders including hidden (starting with a dot) files and directories.
ls –R
(Short from –Recursive) Lists recursively (i.e follows subfolders as well) all files and folders under the current directory.
ls -l
(Short from –long) Lists all files and folders, each on a separate line, and provides additional information about them (permissions, ownership and modified date)
The arguments, as is with most Unix based commands, can be combined. For example:
ls –alR
will list all files (even the hidden files starting with dot), provide more information about them and will continue recursively into each subfolder.
---------------------------------------------
WinSCP
Novell Cool Solutions: Cool Tool
In Brief
Free SFTP and SCP client for Windows for safe copying of files between a local and a remote computer.
Vitals
- Product Categories:
-
- NetWare
- Functional Categories:
-
- Remote Control
- Security
| Updated: | 9 Jul 2006 |
| File Size: | 1.6 MB |
| License: | GPL |
| Download: | http://winscp.net/eng/download.php#download2 |
| Home Page: | http://winscp.sourceforge.net/eng/ |
| Publisher: | Martin Prikryl |
Disclaimer
Please read the note from our friends in legal before using this file.
Details
WinSCP is an open source free SFTP client for Windows using SSH. Legacy SCP protocol is also supported. Its main function is safe copying of files between a local and a remote computer./p>
WinSCP can do all basic operations with files, such as copying and moving (to and from a remote computer). It also allows you to rename files and folders and create new folders.
Features
- Graphical user interface
- Translated into several languages
- Integration with Windows (drag&drop, URL, shortcut icons)
- U3 support
- All common operations with files
- Support for SFTP and SCP protocols over SSH-1 and SSH-2
- Batch file scripting and command-line interface
- Directory synchronization in several semi or fully automatic ways
- Integrated text editor
- Support for SSH password, keyboard-interactive, public key and Kerberos (GSS) authentication
- Integrates with Pageant (PuTTY authentication agent) for full support of public key authentication
- Windows Explorer-like and Norton Commander-like interfaces
- Optionally stores session information
- Optionally supports standalone operation using a configuration file in place of registry entries, suitable for operation from removable media
See Requirements
Novell Cool Solutions (corporate web communities) are produced by WebWise Solutions. www.webwiseone.com
-------------------------------------------------------------------------
Use Winscp to sync files from Windows to Linux
Recently I upgraded my work laptop to Windows 7. At that time I didn’t want to use the previous sync methods that I have blogged about. I wanted to use something simpler (read easier to install and maintain between different machines). After doing some research I settled on using winscp. Winscp supports folder sync operations through a command line. Winscp takes a simple text file listing the commands that it is to execute. This process can be automated on Windows using batches, one to pull changes and the other to push changes.
Create a text file called ‘pull_changes.txt’ and add the following code:
#Pull changes from the remote folder to the local folder
#http://winscp.net/eng/docs/scriptcommand_synchronize


#open a connection to the server specifying the name of the server

#open scp://server.home.com:3687 -privatekey=C:\location\to\private\key.ppk


#open a connection to the server using a saved winscp session

open troy@server.home.com -privatekey=C:\location\to\private\key.ppk


#local folder: C:\Users\troy.williams\Documents\home sync

#remote folder: /home/troy/home sync


# Synchronize my folders, pulling changes from the remote to the local

synchronize local "C:\Users\troy.williams\Documents\home sync" "/home/troy/home sync"


#close the session

close


#exit the scripting environment

exit
Here is the push script, save the lines to a text file called ‘push_changes.txt’:
#push changes from the local folder to the remote folder
#http://winscp.net/eng/docs/scriptcommand_synchronize


#open a connection to the server specifying the name of the server

#open scp://server.home.com:10000 -privatekey=C:\location\to\private\key.ppk


#open a connection to the server using a saved session

open troy@server.home.com -privatekey=C:\location\to\private\key.ppk


#local folder: C:\Users\troy.williams\Documents\home sync

#remote folder: /home/troy/home sync


# Synchronize my folders, pushing changes from the local to the remote

synchronize remote "C:\Users\troy.williams\Documents\home sync" "/home/troy/home sync"


#close the session

close


#exit the scripting environment

exit
Here is an example of a simple batch file that can be used to execute either of the winscp command files:
@rem --------------------------------

@rem created 2011-08-08 copyright (c) 2011 Troy Williams

@rem This file will pull changes from my server at home


@ECHO OFF


-------------------------------------------
Windows Guide To Using WinSCP With iPhone
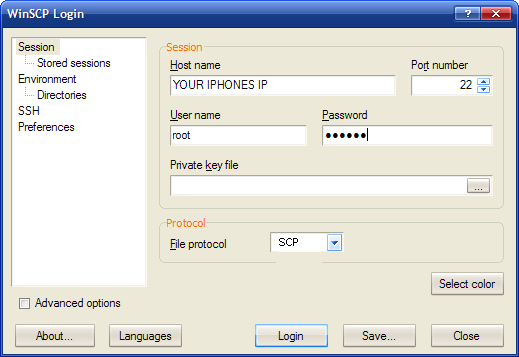
November 26th, 2007 by Limited Edition iPhone · 254 Comments WinSCP and find your iPhone’s ip by going to (on your iphone) settings > Wi-Fi > “Your selected WiFi” > Look under IP Address- Connect to your iPhone using WinSCP (user: root password: alpine) Change File Protocol to SCP
SET WINSCPHOME=C:\Program Files (x86)\WinSCP SET CWOLDPATH=%PATH% SET PATH=%WINSCPHOME%;%PATH% echo Pulling changes from the server winscp.com /script=pull_changes.txt pause
If you need to edit or transfer files on the iPhone and you are using windows, WinSCP is the program you need. Many people have asked me how to transfer files to the iPhone so I made an easy guide to follow bellow. If you would like me to add anything or have questions please let me know.
First make sure you have ssh and bsd subsystem installed from installer. Next get
Just press login after your screen on WinScp
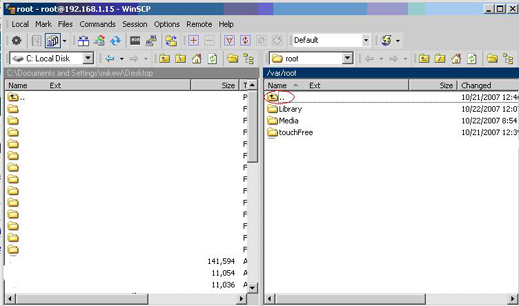
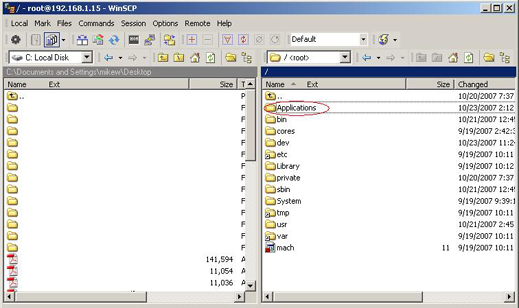
click on the “..” until you see root, then click on the applications folder and put your downloaded .app program inside by dragging and dropping.
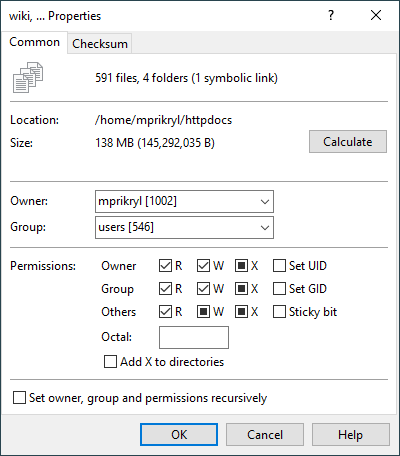
To set file permissions(CHMOD) right click on the folder or file and select properties. Most of the time you will have to change the Octal to 0755. If you have any other questions please ask.
If you are having troubles with log in please read this: http://limitededitioniphone.com/guide-winscp-will-not-connect-network-error-connection-timed-out/