硬盘分区并不复杂,只要你按照下面的图示步步为营,很快就能学会的!
首先你需要利用软盘或光盘启动盘启动计算机,下图是软盘启动后得到的画面。
 screen.width*0.6) {this.resized=true; this.width=screen.width*0.6; this.alt='Click here to open new window\nCTRL+Mouse wheel to zoom in/out';}
}" border="0" />
screen.width*0.6) {this.resized=true; this.width=screen.width*0.6; this.alt='Click here to open new window\nCTRL+Mouse wheel to zoom in/out';}
}" border="0" />在提示符后敲入命令fdisk,然后回车,将会看到以下画面:
 screen.width*0.6) {this.resized=true; this.width=screen.width*0.6; this.alt='Click here to open new window\nCTRL+Mouse wheel to zoom in/out';}
}" border="0" />
screen.width*0.6) {this.resized=true; this.width=screen.width*0.6; this.alt='Click here to open new window\nCTRL+Mouse wheel to zoom in/out';}
}" border="0" />画面大意是说磁盘容量已经超过了512M,为了充分发挥磁盘的性能,建议选用FAT32文件系统,输入“Y”键后按回车键。
现在已经进入了Fdisk的主画面,里面的选项虽然不多,但选项下面还有选项,操作时注意别搞混了。
 screen.width*0.6) {this.resized=true; this.width=screen.width*0.6; this.alt='Click here to open new window\nCTRL+Mouse wheel to zoom in/out';}
}" border="0" />
screen.width*0.6) {this.resized=true; this.width=screen.width*0.6; this.alt='Click here to open new window\nCTRL+Mouse wheel to zoom in/out';}
}" border="0" />图中选项解释:
1、创建DOS分区或逻辑驱动器
2、设置活动分区
3、删除分区或逻辑驱动器
4、显示分区信息
选择“1”后按回车键,画面显示如下:
 screen.width*0.6) {this.resized=true; this.width=screen.width*0.6; this.alt='Click here to open new window\nCTRL+Mouse wheel to zoom in/out';}
}" border="0" />
screen.width*0.6) {this.resized=true; this.width=screen.width*0.6; this.alt='Click here to open new window\nCTRL+Mouse wheel to zoom in/out';}
}" border="0" />图中释义:
1、创建主分区
2、创建扩展分区
3、创建逻辑分区
一般说来,硬盘分区遵循着“主分区→扩展分区→逻辑分区”的次序原则,而删除分区则与之相反。一个硬盘可以划分多个主分区,但没必要划分那么多,一个足矣。主分区之外的硬盘空间就是扩展分区,而逻辑分区是对扩展分区再行划分得到的。
选择“1”后回车确认,Fdisk开始检测硬盘……
 screen.width*0.6) {this.resized=true; this.width=screen.width*0.6; this.alt='Click here to open new window\nCTRL+Mouse wheel to zoom in/out';}
}" border="0" />
screen.width*0.6) {this.resized=true; this.width=screen.width*0.6; this.alt='Click here to open new window\nCTRL+Mouse wheel to zoom in/out';}
}" border="0" />你是否希望将整个硬盘空间作为主分区并激活?主分区一般就是C盘,随着硬盘容量的日益增大,很少有人硬盘只分一个区,所以按“N”并按回车。
 screen.width*0.6) {this.resized=true; this.width=screen.width*0.6; this.alt='Click here to open new window\nCTRL+Mouse wheel to zoom in/out';}
}" border="0" />
screen.width*0.6) {this.resized=true; this.width=screen.width*0.6; this.alt='Click here to open new window\nCTRL+Mouse wheel to zoom in/out';}
}" border="0" />显示硬盘总空间,并继续检测硬盘……
 screen.width*0.6) {this.resized=true; this.width=screen.width*0.6; this.alt='Click here to open new window\nCTRL+Mouse wheel to zoom in/out';}
}" border="0" />
screen.width*0.6) {this.resized=true; this.width=screen.width*0.6; this.alt='Click here to open new window\nCTRL+Mouse wheel to zoom in/out';}
}" border="0" />设置主分区的容量,可直接输入分区大小(以MB为单位)或分区所占硬盘容量的百分比(%),回车确认。
 screen.width*0.6) {this.resized=true; this.width=screen.width*0.6; this.alt='Click here to open new window\nCTRL+Mouse wheel to zoom in/out';}
}" border="0" />
screen.width*0.6) {this.resized=true; this.width=screen.width*0.6; this.alt='Click here to open new window\nCTRL+Mouse wheel to zoom in/out';}
}" border="0" />主分区C盘已经创建,按ESC键继续操作。
 screen.width*0.6) {this.resized=true; this.width=screen.width*0.6; this.alt='Click here to open new window\nCTRL+Mouse wheel to zoom in/out';}
}" border="0" />
screen.width*0.6) {this.resized=true; this.width=screen.width*0.6; this.alt='Click here to open new window\nCTRL+Mouse wheel to zoom in/out';}
}" border="0" />回复至Fdisk主菜单,选择“1”继续操作。
 screen.width*0.6) {this.resized=true; this.width=screen.width*0.6; this.alt='Click here to open new window\nCTRL+Mouse wheel to zoom in/out';}
}" border="0" />
screen.width*0.6) {this.resized=true; this.width=screen.width*0.6; this.alt='Click here to open new window\nCTRL+Mouse wheel to zoom in/out';}
}" border="0" />这一步选“2”,开始创建扩展分区。
 screen.width*0.6) {this.resized=true; this.width=screen.width*0.6; this.alt='Click here to open new window\nCTRL+Mouse wheel to zoom in/out';}
}" border="0" />
screen.width*0.6) {this.resized=true; this.width=screen.width*0.6; this.alt='Click here to open new window\nCTRL+Mouse wheel to zoom in/out';}
}" border="0" />硬盘检验中,稍候……
 screen.width*0.6) {this.resized=true; this.width=screen.width*0.6; this.alt='Click here to open new window\nCTRL+Mouse wheel to zoom in/out';}
}" border="0" />
screen.width*0.6) {this.resized=true; this.width=screen.width*0.6; this.alt='Click here to open new window\nCTRL+Mouse wheel to zoom in/out';}
}" border="0" />习惯上我们会将除主分区之外的所有空间划为扩展分区,直接按回车即可。当然,如果你想安装微软之外的操作系统,则可根据需要输入扩展分区的空间大小或百分比。
 screen.width*0.6) {this.resized=true; this.width=screen.width*0.6; this.alt='Click here to open new window\nCTRL+Mouse wheel to zoom in/out';}
}" border="0" />
screen.width*0.6) {this.resized=true; this.width=screen.width*0.6; this.alt='Click here to open new window\nCTRL+Mouse wheel to zoom in/out';}
}" border="0" />扩展分区创建成功!按ESC键继续操作。
 screen.width*0.6) {this.resized=true; this.width=screen.width*0.6; this.alt='Click here to open new window\nCTRL+Mouse wheel to zoom in/out';}
}" border="0" />
screen.width*0.6) {this.resized=true; this.width=screen.width*0.6; this.alt='Click here to open new window\nCTRL+Mouse wheel to zoom in/out';}
}" border="0" />画面提示没有任何逻辑分区,接下来的任务就是创建逻辑分区。
 screen.width*0.6) {this.resized=true; this.width=screen.width*0.6; this.alt='Click here to open new window\nCTRL+Mouse wheel to zoom in/out';}
}" border="0" />
screen.width*0.6) {this.resized=true; this.width=screen.width*0.6; this.alt='Click here to open new window\nCTRL+Mouse wheel to zoom in/out';}
}" border="0" />前面提过逻辑分区在扩展分区中划分,在此输入第一个逻辑分区的大小或百分比,最高不超过扩展分区的大小。
 screen.width*0.6) {this.resized=true; this.width=screen.width*0.6; this.alt='Click here to open new window\nCTRL+Mouse wheel to zoom in/out';}
}" border="0" />
screen.width*0.6) {this.resized=true; this.width=screen.width*0.6; this.alt='Click here to open new window\nCTRL+Mouse wheel to zoom in/out';}
}" border="0" />逻辑分区D已经创建。
 screen.width*0.6) {this.resized=true; this.width=screen.width*0.6; this.alt='Click here to open new window\nCTRL+Mouse wheel to zoom in/out';}
}" border="0" />
screen.width*0.6) {this.resized=true; this.width=screen.width*0.6; this.alt='Click here to open new window\nCTRL+Mouse wheel to zoom in/out';}
}" border="0" />如法炮制,继续创建逻辑分区。
 screen.width*0.6) {this.resized=true; this.width=screen.width*0.6; this.alt='Click here to open new window\nCTRL+Mouse wheel to zoom in/out';}
}" border="0" />
screen.width*0.6) {this.resized=true; this.width=screen.width*0.6; this.alt='Click here to open new window\nCTRL+Mouse wheel to zoom in/out';}
}" border="0" />逻辑分区E已经创建,按ESC返回。
 screen.width*0.6) {this.resized=true; this.width=screen.width*0.6; this.alt='Click here to open new window\nCTRL+Mouse wheel to zoom in/out';}
}" border="0" />
screen.width*0.6) {this.resized=true; this.width=screen.width*0.6; this.alt='Click here to open new window\nCTRL+Mouse wheel to zoom in/out';}
}" border="0" />当然,你还可以创建更多的逻辑分区,一切由你自己决定。
又回复至主菜单,选“2”设置活动分区。
 screen.width*0.6) {this.resized=true; this.width=screen.width*0.6; this.alt='Click here to open new window\nCTRL+Mouse wheel to zoom in/out';}
}" border="0" />
screen.width*0.6) {this.resized=true; this.width=screen.width*0.6; this.alt='Click here to open new window\nCTRL+Mouse wheel to zoom in/out';}
}" border="0" />只有主分区才可以被设置为活动分区!
选择数字“1”,即设C盘为活动分区。当硬盘划分了多个主分区后,可设其中任一个为活动分区。
 screen.width*0.6) {this.resized=true; this.width=screen.width*0.6; this.alt='Click here to open new window\nCTRL+Mouse wheel to zoom in/out';}
}" border="0" />
screen.width*0.6) {this.resized=true; this.width=screen.width*0.6; this.alt='Click here to open new window\nCTRL+Mouse wheel to zoom in/out';}
}" border="0" />C盘已经成为活动分区,按ESC键继续。
 screen.width*0.6) {this.resized=true; this.width=screen.width*0.6; this.alt='Click here to open new window\nCTRL+Mouse wheel to zoom in/out';}
}" border="0" />
screen.width*0.6) {this.resized=true; this.width=screen.width*0.6; this.alt='Click here to open new window\nCTRL+Mouse wheel to zoom in/out';}
}" border="0" />五、注意事项
必须重新启动计算机,这样分区才能够生效;重启后必须格式化硬盘的每个分区,这样分区才能够使用。
 screen.width*0.6) {this.resized=true; this.width=screen.width*0.6; this.alt='Click here to open new window\nCTRL+Mouse wheel to zoom in/out';}
}" border="0" />
screen.width*0.6) {this.resized=true; this.width=screen.width*0.6; this.alt='Click here to open new window\nCTRL+Mouse wheel to zoom in/out';}
}" border="0" />如果你打算对一块硬盘重新分区,那么你首先要做的是删除旧分区!因此仅仅学会创建分区是不够的!
删除分区,在Fdisk主菜单中选“3”后按回车键。
 screen.width*0.6) {this.resized=true; this.width=screen.width*0.6; this.alt='Click here to open new window\nCTRL+Mouse wheel to zoom in/out';}
}" border="0" />
screen.width*0.6) {this.resized=true; this.width=screen.width*0.6; this.alt='Click here to open new window\nCTRL+Mouse wheel to zoom in/out';}
}" border="0" />删除分区的顺序从下往上,即“非DOS分区”→“逻辑分区”→“扩展分区”→“主分区”。
注意:除非你安装了非Windows的操作系统,否则一般不会产生非DOS分区。所以在此选先选“3”。
 screen.width*0.6) {this.resized=true; this.width=screen.width*0.6; this.alt='Click here to open new window\nCTRL+Mouse wheel to zoom in/out';}
}" border="0" />
screen.width*0.6) {this.resized=true; this.width=screen.width*0.6; this.alt='Click here to open new window\nCTRL+Mouse wheel to zoom in/out';}
}" border="0" />输入欲删除的逻辑分区盘符,按回车确定。
 screen.width*0.6) {this.resized=true; this.width=screen.width*0.6; this.alt='Click here to open new window\nCTRL+Mouse wheel to zoom in/out';}
}" border="0" />
 screen.width*0.6) {this.resized=true; this.width=screen.width*0.6; this.alt='Click here to open new window\nCTRL+Mouse wheel to zoom in/out';}
}" border="0" />
screen.width*0.6) {this.resized=true; this.width=screen.width*0.6; this.alt='Click here to open new window\nCTRL+Mouse wheel to zoom in/out';}
}" border="0" />敲入该分区的盘符(卷标),无则留空。
 screen.width*0.6) {this.resized=true; this.width=screen.width*0.6; this.alt='Click here to open new window\nCTRL+Mouse wheel to zoom in/out';}
}" border="0" />
screen.width*0.6) {this.resized=true; this.width=screen.width*0.6; this.alt='Click here to open new window\nCTRL+Mouse wheel to zoom in/out';}
}" border="0" />按“Y”确认删除。
 screen.width*0.6) {this.resized=true; this.width=screen.width*0.6; this.alt='Click here to open new window\nCTRL+Mouse wheel to zoom in/out';}
}" border="0" />
screen.width*0.6) {this.resized=true; this.width=screen.width*0.6; this.alt='Click here to open new window\nCTRL+Mouse wheel to zoom in/out';}
}" border="0" />如是,可将所有逻辑分区删除。
 screen.width*0.6) {this.resized=true; this.width=screen.width*0.6; this.alt='Click here to open new window\nCTRL+Mouse wheel to zoom in/out';}
}" border="0" />
 screen.width*0.6) {this.resized=true; this.width=screen.width*0.6; this.alt='Click here to open new window\nCTRL+Mouse wheel to zoom in/out';}
}" border="0" />
screen.width*0.6) {this.resized=true; this.width=screen.width*0.6; this.alt='Click here to open new window\nCTRL+Mouse wheel to zoom in/out';}
}" border="0" />返回到主菜单,再次选“3”,预备删除扩展分区。
 screen.width*0.6) {this.resized=true; this.width=screen.width*0.6; this.alt='Click here to open new window\nCTRL+Mouse wheel to zoom in/out';}
}" border="0" />
screen.width*0.6) {this.resized=true; this.width=screen.width*0.6; this.alt='Click here to open new window\nCTRL+Mouse wheel to zoom in/out';}
}" border="0" />选“2”后回车。
 screen.width*0.6) {this.resized=true; this.width=screen.width*0.6; this.alt='Click here to open new window\nCTRL+Mouse wheel to zoom in/out';}
}" border="0" />
screen.width*0.6) {this.resized=true; this.width=screen.width*0.6; this.alt='Click here to open new window\nCTRL+Mouse wheel to zoom in/out';}
}" border="0" />确认删除,按“Y”。
 screen.width*0.6) {this.resized=true; this.width=screen.width*0.6; this.alt='Click here to open new window\nCTRL+Mouse wheel to zoom in/out';}
}" border="0" />
screen.width*0.6) {this.resized=true; this.width=screen.width*0.6; this.alt='Click here to open new window\nCTRL+Mouse wheel to zoom in/out';}
}" border="0" />扩展分区已经删除。
 screen.width*0.6) {this.resized=true; this.width=screen.width*0.6; this.alt='Click here to open new window\nCTRL+Mouse wheel to zoom in/out';}
}" border="0" />
screen.width*0.6) {this.resized=true; this.width=screen.width*0.6; this.alt='Click here to open new window\nCTRL+Mouse wheel to zoom in/out';}
}" border="0" />返回到主菜单,依旧选“3”。
 screen.width*0.6) {this.resized=true; this.width=screen.width*0.6; this.alt='Click here to open new window\nCTRL+Mouse wheel to zoom in/out';}
}" border="0" />
screen.width*0.6) {this.resized=true; this.width=screen.width*0.6; this.alt='Click here to open new window\nCTRL+Mouse wheel to zoom in/out';}
}" border="0" />选“1”,删除主分区。
 screen.width*0.6) {this.resized=true; this.width=screen.width*0.6; this.alt='Click here to open new window\nCTRL+Mouse wheel to zoom in/out';}
}" border="0" />
screen.width*0.6) {this.resized=true; this.width=screen.width*0.6; this.alt='Click here to open new window\nCTRL+Mouse wheel to zoom in/out';}
}" border="0" />按“1”,表示删除第一个主分区。当有多个主分区时,需要分别删除。
 screen.width*0.6) {this.resized=true; this.width=screen.width*0.6; this.alt='Click here to open new window\nCTRL+Mouse wheel to zoom in/out';}
}" border="0" />
screen.width*0.6) {this.resized=true; this.width=screen.width*0.6; this.alt='Click here to open new window\nCTRL+Mouse wheel to zoom in/out';}
}" border="0" />按“Y”确认删除。
 screen.width*0.6) {this.resized=true; this.width=screen.width*0.6; this.alt='Click here to open new window\nCTRL+Mouse wheel to zoom in/out';}
}" border="0" />
screen.width*0.6) {this.resized=true; this.width=screen.width*0.6; this.alt='Click here to open new window\nCTRL+Mouse wheel to zoom in/out';}
}" border="0" />主分区已经删除。
 screen.width*0.6) {this.resized=true; this.width=screen.width*0.6; this.alt='Click here to open new window\nCTRL+Mouse wheel to zoom in/out';}
}" border="0" />
screen.width*0.6) {this.resized=true; this.width=screen.width*0.6; this.alt='Click here to open new window\nCTRL+Mouse wheel to zoom in/out';}
}" border="0" />重启后操作生效。
 screen.width*0.6) {this.resized=true; this.width=screen.width*0.6; this.alt='Click here to open new window\nCTRL+Mouse wheel to zoom in/out';}
}" border="0" />
screen.width*0.6) {this.resized=true; this.width=screen.width*0.6; this.alt='Click here to open new window\nCTRL+Mouse wheel to zoom in/out';}
}" border="0" />终于编辑完毕,希望各位看完之后,能够赏个脸,投个票,非常感谢.
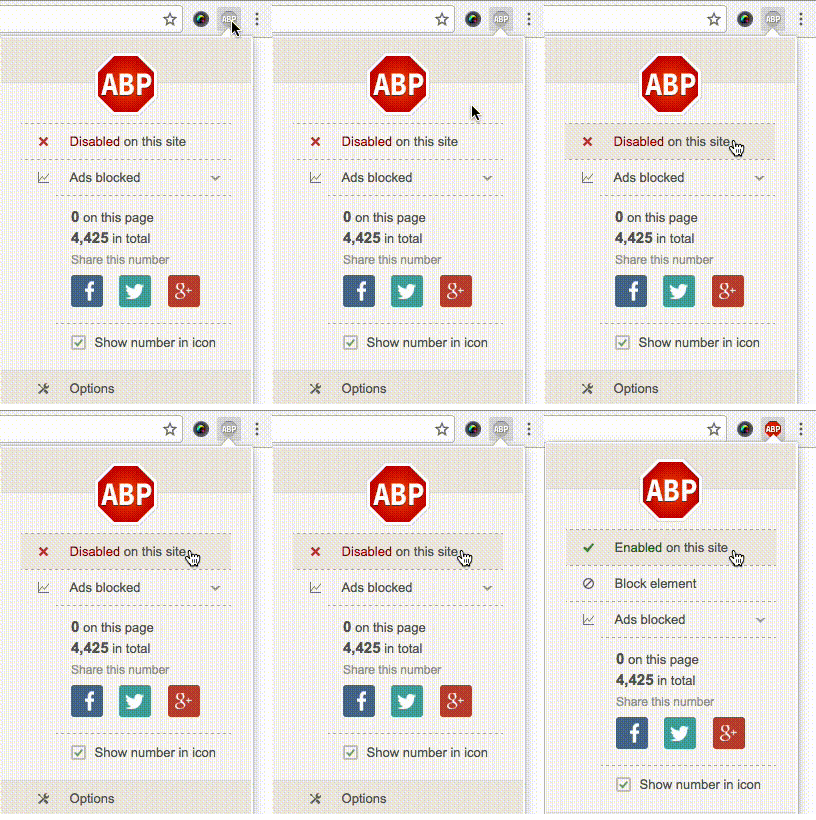
 选择“Disable on www.wenxuecity.com”
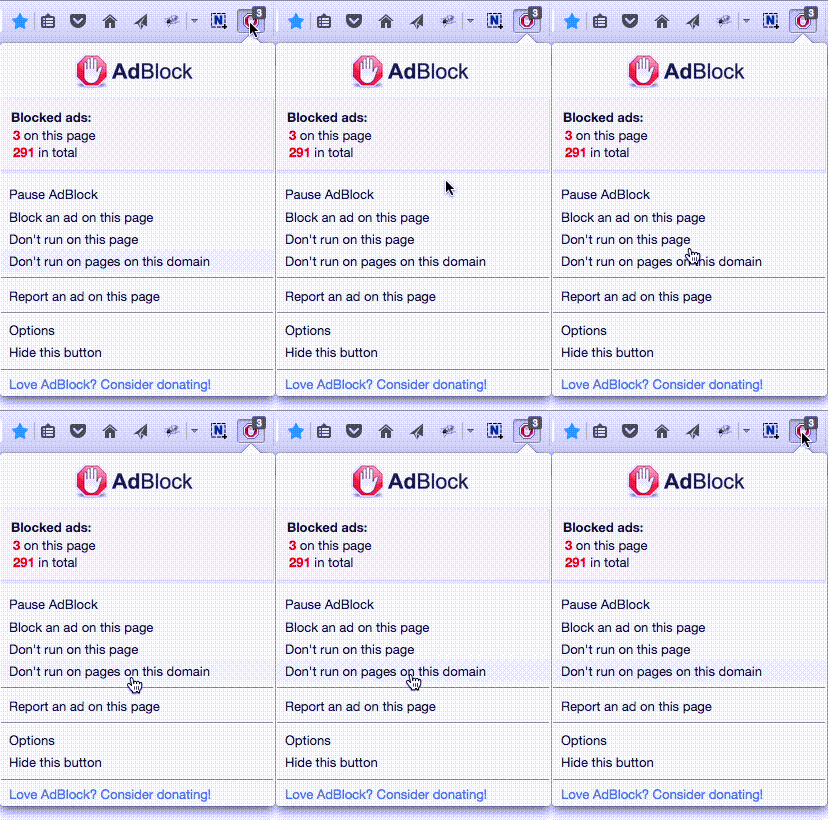
 选择“don't run on pages on this domain”

